

This is the series of articles about how to setup free own mailserver on OCI.
- Free Mail Server on OCI – Oracle Cloud Account
- Free Mail Server on OCI – Your Domain Name
- Free Mail Server on OCI – IPv4 Address, PTR
- Free Mail Server on OCI – Data Block Volume
- Free Mail Server on OCI – Virtual Cloud Network
- Free Mail Server on OCI – Compute Instance
- Free Mail Server on OCI – Swapfile
- Free Mail Server on OCI – OCFS2
- Free Mail Server on OCI – Docker, Cron, Certbot
- Free Mail Server on OCI – Docker-Mailserver
How to create Oracle Cloud Account and basic setup you can find in this article.
How to link your Domain Name to OCI you can find in this article.
How to reserve public IPv4 address and setup PTR in OCI you can find in this article.
How to create and link Data Block Volume to OCI you can find in this article.
How to create Virtual Cloud Network in OCI you can find in this article.
How to create Compute instance Virtual Machine in OCI you can find in this article.
About Swapfile and why it needs to be created you can find in this article.
Firewalld
You will need to install firewalld to manage the iptables on your VM if you use Oracle Ubuntu image.
Run the following command:
sudo apt update && \
sudo apt install firewalld
Configuring OCFS2
Now it’s time to prepare and mount the Shareable Block Volume, for this we would need to set up OCFS2.
All details about the meaning of the steps below you will find on this page, and on this page, I will make it short.
1. OCFS2 and iSCSI ports
Go to your VCN, under Resources find Security Lists (there should be 2), open any security list (or create a new one) and create 2 Ingress Rules for your private local network:
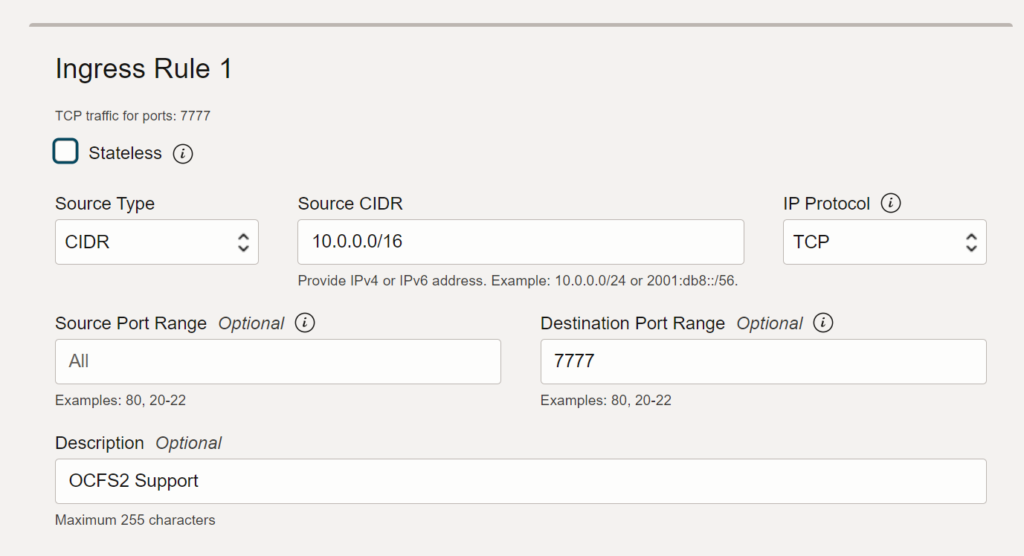
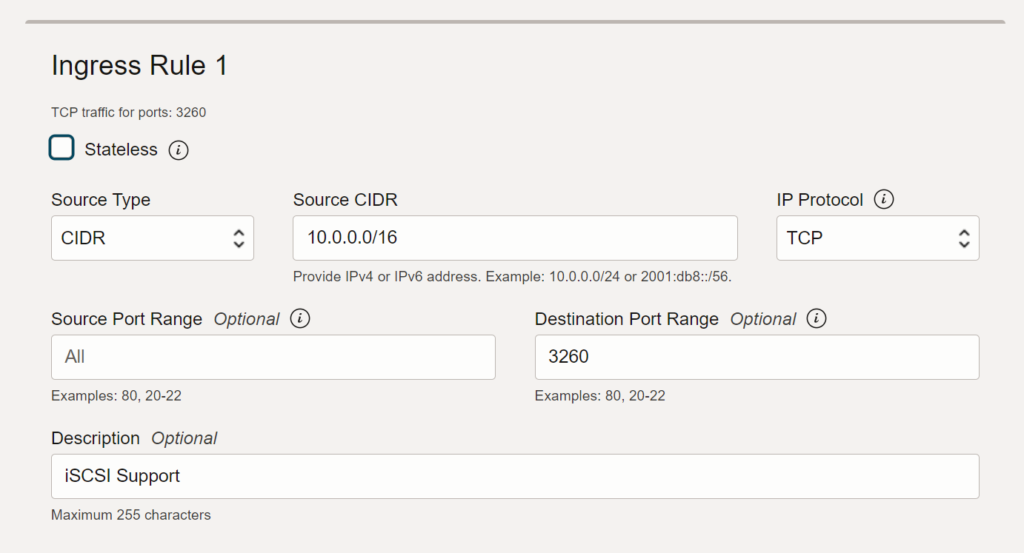
Click on Add Ingress Rules button to save and apply your changes.
Open the port in your Ubuntu iptables:
sudo firewall-cmd --zone=public --permanent --add-port=7777/tcp && \
sudo firewall-cmd --zone=public --permanent --add-port=7777/udp && \
sudo firewall-cmd --zone=public --permanent --add-port=3260/tcp && \
sudo firewall-cmd --zone=public --permanent --add-port=3260/udp && \
sudo firewall-cmd --complete-reload
You should see success response after each of these commands.
2. DNS
Additionally, ensure that DNS is working properly and that the compute instances can communicate across the tenancy’s availability domains. Here’s an example of the /etc/resolv.conf file based on this setup:
ubuntu@mailserver:/$ cat /etc/resolv.conf
# This is /run/systemd/resolve/stub-resolv.conf managed by man:systemd-resolved(8).
# Do not edit.
#
# This file might be symlinked as /etc/resolv.conf. If you're looking at
# /etc/resolv.conf and seeing this text, you have followed the symlink.
#
# This is a dynamic resolv.conf file for connecting local clients to the
# internal DNS stub resolver of systemd-resolved. This file lists all
# configured search domains.
#
# Run "resolvectl status" to see details about the uplink DNS servers
# currently in use.
#
# Third party programs should typically not access this file directly, but only
# through the symlink at /etc/resolv.conf. To manage man:resolv.conf(5) in a
# different way, replace this symlink by a static file or a different symlink.
#
# See man:systemd-resolved.service(8) for details about the supported modes of
# operation for /etc/resolv.conf.

nameserver 127.0.0.53
options edns0 trust-ad
search mailserver.oraclevcn.com
All availability domain DNS entries must be available in the resolv.conf file.
3. Cluster Stack Configuration File
Install the required OCFS2 packages:
sudo apt-get update && sudo apt-get install ocfs2-tools-dev ocfs2-tools -yCreate the configuration file by using the o2cb command or a text editor. Let’s use the following command to create a cluster definition. This command creates the /etc/ocfs2/cluster.conf cluster configuration file if it doesn’t already exist:
sudo o2cb add-cluster ociocfs2For each node (we have only 1 for now – the current VM instance), use the following command to define the node:
sudo o2cb add-node ociocfs2 mailserver --ip 10.0.0.18Note: The name of the node must be the same as the value of the system’s HOSTNAME that is configured in /etc/hostname (in my case it’s mailserver), and the IP address is the one that the node will use for private communication in the cluster (in my case it’s 10.0.0.18). Copy the /etc/ocfs2/cluster.conf cluster configuration file to each node in the cluster. Any changes made to the cluster configuration file don’t take effect until the restart of the cluster stack.
The following /etc/ocfs2/cluster.conf configuration file defines a 2-node cluster named ociocfs2 with a local heartbeat, which is the configuration used in this article:
cluster:
        name = ociocfs2
        heartbeat_mode = local
        node_count = 2

node:
        cluster = ociocfs2
        number = 0
        ip_port = 7777
        ip_address = 10.0.0.18
        name = mailserver

node:
        cluster = ociocfs2
        number = 1
        ip_port = 7777
        ip_address = 10.1.0.23
        name = webserver
4. Configuring the Cluster Stack
Run the following command on each node of the cluster:
ubuntu@mailserver:/$ sudo dpkg-reconfigure ocfs2-tools
debconf: unable to initialize frontend: Dialog
debconf: (No usable dialog-like program is installed, so the dialog based frontend cannot be used. at /usr/share/perl5/Debconf/FrontEnd/Dialog.pm line 78.)
debconf: falling back to frontend: Readline
Configuring ocfs2-tools
-----------------------

Would you like to start an OCFS2 cluster (O2CB) at boot time? [yes/no] yes

Name of the cluster to start at boot time: ociocfs2

The O2CB heartbeat threshold sets up the maximum time in seconds that a node awaits for an I/O operation.
After it, the node "fences" itself, and you will probably see a crash.

It is calculated as the result of: (threshold - 1) x 2.

Its default value is 31 (60 seconds).

Raise it if you have slow disks and/or crashes with kernel messages like:

o2hb_write_timeout: 164 ERROR: heartbeat write timeout to device XXXX after NNNN milliseconds

O2CB heartbeat threshold: 31

The O2CB idle timeout (expressed in milliseconds) is the time before a network connection is considered dead.

Its default value is 30000 (30 seconds) and the minimum recommended value is 5000 (5 seconds).

O2CB idle timeout: 30000

The O2CB keepalive delay (expressed in milliseconds) is the maximum time before a keepalive packet is sent.

Its default value is 2000 (2 seconds) and the minimum recommended value is 1000 (1 second).

O2CB keepalive delay: 2000

The O2CB reconnect delay (expressed in milliseconds) is the minimum time between connection attempts.

Its default and recommended minimum value is 2000 (2 seconds).

O2CB reconnect delay: 2000
Set cluster stack online:
ubuntu@mailserver:/$ sudo service o2cb online
checking debugfs...
Loading stack plugin "o2cb": OK
Loading filesystem "ocfs2_dlmfs": OK
Creating directory '/dlm': OK
Mounting ocfs2_dlmfs filesystem at /dlm: OK
Setting cluster stack "o2cb": OK
Registering O2CB cluster "ociocfs2": OK
Setting O2CB cluster timeouts : OK
To verify the cluster stack service status, run the following command:
ubuntu@mailserver:/$ sudo service o2cb status
● o2cb.service - LSB: Load O2CB cluster services at system boot.
     Loaded: loaded (/etc/init.d/o2cb; generated)
     Active: active (exited) since Wed 2024-03-06 14:27:14 UTC; 41min ago
       Docs: man:systemd-sysv-generator(8)
        CPU: 9ms

Mar 06 14:27:14 mailserver systemd[1]: Starting LSB: Load O2CB cluster services at system boot....
Mar 06 14:27:14 mailserver systemd[1]: Started LSB: Load O2CB cluster services at system boot..
To verify OCFS2 service status run the following command:
ubuntu@mailserver:/$ sudo service ocfs2 status
● ocfs2.service - LSB: Mount OCFS2 volumes at boot.
     Loaded: loaded (/etc/init.d/ocfs2; generated)
     Active: active (exited) since Wed 2024-03-06 14:27:14 UTC; 41min ago
       Docs: man:systemd-sysv-generator(8)
    Process: 818 ExecStart=/etc/init.d/ocfs2 start (code=exited, status=0/SUCCESS)
        CPU: 13ms

Mar 06 14:27:14 mailserver systemd[1]: Starting LSB: Mount OCFS2 volumes at boot....
Mar 06 14:27:14 mailserver systemd[1]: Started LSB: Mount OCFS2 volumes at boot..
Reboot your VM instance and check the status again:
sudo rebootubuntu@mailserver:/$ sudo service o2cb status
● o2cb.service - LSB: Load O2CB cluster services at system boot.
Loaded: loaded (/etc/init.d/o2cb; generated)
Active: active (running) since Wed 2024-03-06 15:10:44 UTC; 45s ago
Docs: man:systemd-sysv-generator(8)
Process: 674 ExecStart=/etc/init.d/o2cb start (code=exited, status=0/SUCCESS)
Tasks: 1 (limit: 14216)
Memory: 2.7M
CPU: 103ms
CGroup: /system.slice/o2cb.service
└─817 o2hbmonitor
Mar 06 15:10:42 mailserver systemd[1]: Starting LSB: Load O2CB cluster services at system boot....
Mar 06 15:10:43 mailserver o2cb[674]: checking debugfs...
Mar 06 15:10:43 mailserver o2cb[674]: Loading stack plugin "o2cb": OK
Mar 06 15:10:44 mailserver o2cb[674]: Loading filesystem "ocfs2_dlmfs": OK
Mar 06 15:10:44 mailserver o2cb[674]: Mounting ocfs2_dlmfs filesystem at /dlm: OK
Mar 06 15:10:44 mailserver o2cb[674]: Setting cluster stack "o2cb": OK
Mar 06 15:10:44 mailserver o2cb[674]: Registering O2CB cluster "ociocfs2": OK
Mar 06 15:10:44 mailserver o2cb[674]: Setting O2CB cluster timeouts : OK
Mar 06 15:10:44 mailserver o2hbmonitor[817]: Starting
Mar 06 15:10:44 mailserver systemd[1]: Started LSB: Load O2CB cluster services at system boot..Everything seems working OK.
5. Configure the Kernel for Cluster Operation
On each node, enter the following commands to set the recommended values for panic and panic_on_oops:
sudo sysctl kernel.panic=30
sudo sysctl kernel.panic_on_oops=1
To make the change persist across reboots, add the following entries to the /etc/sysctl.conf file:
# Define panic and panic_on_oops for cluster operation
kernel.panic=30
kernel.panic_on_oops=1
Starting and Stopping the Cluster Stack
The following table shows the common commands for performing various operations on the cluster stack:
| Command | Description |
| sudo service o2cb status | Check the status of the cluster stack |
| sudo service o2cb online | Start the cluster stack |
| sudo service o2cb offline | Stop the cluster stack |
| sudo service o2cb unload | Unload the cluster stack |
All available commands for o2cb service you can find by running the command:
ubuntu@mailserver:/$ sudo service o2cb help
Usage: /etc/init.d/o2cb {start|stop|restart|force-reload|enable|disable|configure|load|unload|online|offline|force-offline|status|online-status}
And for ocfs2 service:
ubuntu@mailserver:/$ sudo service ocfs2 help
Usage: /etc/init.d/ocfs2 {start|stop|status|reload|force-reload|restart|try-restart}
Create the OCFS2 Volume
List your attached Volumes:
ubuntu@mailserver:/$ lsblk -f
NAME  FSTYPE FSVER LABEL         UUID                                 FSAVAIL FSUSE% MOUNTPOINTS
loop0 squash 4.0                                                            0   100% /snap/core18/2810
loop1 squash 4.0                                                            0   100% /snap/oracle-cloud-agent/69
loop2 squash 4.0                                                            0   100% /snap/oracle-cloud-agent/71
loop3 squash 4.0                                                            0   100% /snap/snapd/20674
loop4 squash 4.0                                                            0   100% /snap/snapd/21185
sda
├─sda1
│     ext4   1.0   cloudimg-rootfs
│                                ebbef782-d3d7-41a2-830e-be3c9d27f13a   41.5G    14% /
└─sda15
      vfat   FAT32 UEFI          827A-55EB                              91.2M     6% /boot/efi
sdb
The Shareable volume is /dev/sdb. Let’s create a partition table for this volume:
sudo parted /dev/sdbType print, you should see the details of your volume:
ubuntu@mailserver:/$ sudo parted /dev/sdb
GNU Parted 3.4
Using /dev/sdb
Welcome to GNU Parted! Type 'help' to view a list of commands.
(parted) print
Error: /dev/sdb: unrecognised disk label
Model: ORACLE BlockVolume (scsi)
Disk /dev/sdb: 53.7GB
Sector size (logical/physical): 512B/4096B
Partition Table: unknown
Disk Flags:
(parted)
Type mklabel gpt command:
(parted) mklabel gpt
(parted) print
Model: ORACLE BlockVolume (scsi)
Disk /dev/sdb: 53.7GB
Sector size (logical/physical): 512B/4096B
Partition Table: gpt
Disk Flags:

Number  Start  End  Size  File system  Name  Flags

(parted)
Create partition table, type mkpart primary 0% 100% command:
(parted) mkpart primary 0% 100%
(parted) print
Model: ORACLE BlockVolume (scsi)
Disk /dev/sdb: 53.7GB
Sector size (logical/physical): 512B/4096B
Partition Table: gpt
Disk Flags:

Number  Start   End     Size    File system  Name     Flags
 1      1049kB  53.7GB  53.7GB               primary
And then type quit to save the changes:
(parted) quit
Information: You may need to update /etc/fstab.
Format OCFS2 Volume:
ubuntu@mailserver:/$ sudo mkfs.ocfs2 -L "ocfs2" /dev/sdb1
mkfs.ocfs2 1.8.7
Cluster stack: classic o2cb
Label: ocfs2
Features: sparse extended-slotmap backup-super unwritten inline-data strict-journal-super xattr indexed-dirs refcount discontig-bg append-dio
Block size: 4096 (12 bits)
Cluster size: 4096 (12 bits)
Volume size: 53684994048 (13106688 clusters) (13106688 blocks)
Cluster groups: 407 (tail covers 10752 clusters, rest cover 32256 clusters)
Extent allocator size: 8388608 (2 groups)
Journal size: 268435456
Node slots: 8
Creating bitmaps: done
Initializing superblock: done
Writing system files: done
Writing superblock: done
Writing backup superblock: 3 block(s)
Formatting Journals: done
Growing extent allocator: done
Formatting slot map: done
Formatting quota files: done
Writing lost+found: done
mkfs.ocfs2 successful
6. Mount the OCFS2 Volume
Create a mounting folder:
sudo mkdir /dataMount the OCFS2 Volume to the /data folder:
sudo mount -L ocfs2 /dataIf OCFS2 cluster configured properly and running OK, your drive should be mounted within 1-10 seconds, otherwise you might wait 30 seconds and check the logs:
sudo journalctl -kfIf you connect your node to existing and already running cluster you might need to reboot all machines to apply the changes.
Add the mounted OCFS2 Volume to the /etc/fstab file, so it will be mounted automatically on start/restart VM instance, first, note the UUID of the /dev/sdb1 Volume:
ubuntu@mailserver:/$ lsblk -f
NAME    FSTYPE   FSVER LABEL           UUID                                 FSAVAIL FSUSE% MOUNTPOINTS
loop0   squashfs 4.0                                                              0   100% /snap/core18/2810
loop1   squashfs 4.0                                                              0   100% /snap/oracle-cloud-agent/69
loop2   squashfs 4.0                                                              0   100% /snap/oracle-cloud-agent/71
loop3   squashfs 4.0                                                              0   100% /snap/snapd/20674
loop4   squashfs 4.0                                                              0   100% /snap/snapd/21185
sda
├─sda1  ext4     1.0   cloudimg-rootfs ebbef782-d3d7-41a2-830e-be3c9d27f13a   41.5G    14% /
└─sda15 vfat     FAT32 UEFI            827A-55EB                              91.2M     6% /boot/efi
sdb
└─sdb1  ocfs2    0.90  ocfs2           f1dbc91a-047b-46fb-9da6-0935865b0c26   47.9G     4% /data
Add the record to /etc/fstab file:
echo "UUID=f1dbc91a-047b-46fb-9da6-0935865b0c26 /data ocfs2 _netdev,defaults 0 0" | sudo tee -a /etc/fstabAnd run mount -a to remount all the volumes from /etc/fstab and save the changes:
sudo mount -aCongratulations, the Shareable Block Volume is successfully created and mounted.
From now on, on any other VM instance you can repeat the steps from 1 to 6 (skip the step when we create and format a volume, since its needed only once) and you will get access to the files stored on data Shareable Volume.
Upgrade issues
There might be an issue when you upgrade your OS (Ubuntu/Debian) and Linux kernel to the newer version on OCI (Oracle Clouds), o2cb and ocfs2 services stops working as expected and the Block Volume (Data) won’t be mounted on next start/restart of your VM, BE CAREFULL!
The solution would be after your’ve upgraded your Linux kernel install linux modules extra oracle package for your new kernel.
Find your Linux Kernel:
uname -rsLinux 6.5.0-1019-oracleThen install linux-modules-extra-<kernel>-oracle package for your kernel:
sudo apt-get install linux-modules-extra-6.5.0-1019-oracleReading package lists... Done
Building dependency tree... Done
Reading state information... Done
The following NEW packages will be installed:
linux-modules-extra-6.5.0-1019-oracle
0 upgraded, 1 newly installed, 0 to remove and 0 not upgraded.
Need to get 77.4 MB of archives.
After this operation, 455 MB of additional disk space will be used.
Get:1 http://uk-london-1-ad-1.clouds.ports.ubuntu.com/ubuntu-ports jammy-updates/main arm64 linux-modules-extra-6.5.0-1019-oracle arm64 6.5.0-1019.19~22.04.1 [77.4 MB]
Fetched 77.4 MB in 1s (89.5 MB/s)
debconf: delaying package configuration, since apt-utils is not installed
Selecting previously unselected package linux-modules-extra-6.5.0-1019-oracle.
(Reading database ... 92112 files and directories currently installed.)
Preparing to unpack .../linux-modules-extra-6.5.0-1019-oracle_6.5.0-1019.19~22.04.1_arm64.deb ...
Unpacking linux-modules-extra-6.5.0-1019-oracle (6.5.0-1019.19~22.04.1) ...
Setting up linux-modules-extra-6.5.0-1019-oracle (6.5.0-1019.19~22.04.1) ...
Processing triggers for linux-image-6.5.0-1019-oracle (6.5.0-1019.19~22.04.1) ...
/etc/kernel/postinst.d/initramfs-tools:
update-initramfs: Generating /boot/initrd.img-6.5.0-1019-oracle
/etc/kernel/postinst.d/zz-update-grub:
Sourcing file `/etc/default/grub'
Sourcing file `/etc/default/grub.d/50-cloudimg-settings.cfg'
Sourcing file `/etc/default/grub.d/init-select.cfg'
Generating grub configuration file ...
Found linux image: /boot/vmlinuz-6.5.0-1019-oracle
Found initrd image: /boot/initrd.img-6.5.0-1019-oracle
Found linux image: /boot/vmlinuz-5.15.0-1051-oracle
Found initrd image: /boot/initrd.img-5.15.0-1051-oracle
Warning: os-prober will not be executed to detect other bootable partitions.
Systems on them will not be added to the GRUB boot configuration.
Check GRUB_DISABLE_OS_PROBER documentation entry.
Adding boot menu entry for UEFI Firmware Settings ...
done
debconf: unable to initialize frontend: Dialog
debconf: (No usable dialog-like program is installed, so the dialog based frontend cannot be used. at /usr/share/perl5/Debconf/FrontEnd/Dialog.pm line 78.)
debconf: falling back to frontend: Readline
Scanning processes...
Scanning linux images...
Running kernel seems to be up-to-date.
No services need to be restarted.
No containers need to be restarted.
No user sessions are running outdated binaries.
No VM guests are running outdated hypervisor (qemu) binaries on this host.Time to Install and set up Docker, Cron and Certbot, follow this article.
Leave a Reply
You must be logged in to post a comment.