

This is the series of articles about how to setup free own mailserver on OCI.
- Free Mail Server on OCI – Oracle Cloud Account
- Free Mail Server on OCI – Your Domain Name
- Free Mail Server on OCI – IPv4 Address, PTR
- Free Mail Server on OCI – Data Block Volume
- Free Mail Server on OCI – Virtual Cloud Network
- Free Mail Server on OCI – Compute Instance
- Free Mail Server on OCI – Swapfile
- Free Mail Server on OCI – OCFS2
- Free Mail Server on OCI – Docker, Cron, Certbot
- Free Mail Server on OCI – Docker-Mailserver
How to create Oracle Cloud Account and basic setup you can find in this article.
How to link your Domain Name to OCI you can find in this article.
How to reserve public IPv4 address and setup PTR in OCI you can find in this article.
How to create and link Data Block Volume to OCI you can find in this article.
How to create Virtual Cloud Network in OCI you can find in this article.
How to create Compute instance Virtual Machine in OCI you can find in this article.
About Swapfile and why it needs to be created you can find in this article.
What is OCFS2 and why we need to configure it you can find out in this article.
How to install Docker, Compose and Certbot to generate certificates you can find in this article.
Docker-Mailserver
As I mentioned earlier, our Mail Server is based on the Dockerized Container Image Docker-Mailserver, documentation is here.
Edit your compose.yaml file and add mailserver service so it’ll look like this:
services:
  # mailserver container
  mailserver:
    image: mailserver/docker-mailserver:latest
    container_name: mailserver
    # Provide the FQDN of your mail server here (Your DNS MX record should point to this value)
    hostname: mail.mymail.com
    env_file: ./mailserver.env
    ports:
      - "25:25" # SMTP (explicit TLS => STARTTLS)
      - "143:143" # IMAP4 (explicit TLS => STARTTLS)
      - "465:465" # ESMTP (implicit TLS)
      - "587:587" # ESMTP (explicit TLS => STARTTLS)
      - "993:993" # IMAP4 (implicit TLS)
    volumes:
      - /data/dms/mail-data/:/var/mail/
      - /data/dms/mail-state/:/var/mail-state/
      - /data/dms/mail-logs/:/var/log/mail/
      - /data/dms/config/:/tmp/docker-mailserver/
      - /data/certbot/certs/:/etc/letsencrypt/:ro
      - /etc/localtime:/etc/localtime:ro
    restart: always
    stop_grace_period: 1m
    # Uncomment if using `ENABLE_FAIL2BAN=1`:
    cap_add:
      - NET_ADMIN
    healthcheck:
      test: "ss --listening --tcp | grep -P 'LISTEN.+:smtp' || exit 1"
      timeout: 3s
      retries: 0

  # certbot generate SSL certs
  certbot-cloudflare:
    image: certbot/dns-cloudflare:latest
    command: certonly --dns-cloudflare --dns-cloudflare-credentials /run/secrets/cloudflare.ini -d mail.mymail.com
    volumes:
      - /data/certbot/certs/:/etc/letsencrypt/
      - /data/certbot/logs/:/var/log/letsencrypt/
    secrets:
      - source: cloudflare
        target: cloudflare.ini

  # certbot renew SSL certs
  certbot-cloudflare-renew:
    image: certbot/dns-cloudflare:latest
    command: renew --reuse-key --dns-cloudflare --dns-cloudflare-credentials /run/secrets/cloudflare.ini
    volumes:
      - /data/certbot/certs/:/etc/letsencrypt/
      - /data/certbot/logs/:/var/log/letsencrypt/
    secrets:
      - source: cloudflare
        target: cloudflare.ini

secrets:
  cloudflare:
    file: /data/secrets/cloudflare.ini
Also, follow the instruction from this document and download the mailserver.env file, edit it as you need, I just add that I’ve changed the following ENV parameters for my mailserver (read comments in mailserver.enf file for more details and meaning of each parameter):
- TLS_LEVEL=intermediate
- SPOOF_PROTECTION=1
- ENABLE_OPENDKIM=0 (I’m using rspamd)
- ENABLE_OPENDMARC=0 (I’m using rspamd)
- ENABLE_POLICYD_SPF=0 (I’m using rspamd)
- ENABLE_POP3= (disabled)
- ENABLE_IMAP=1 (enabled)
- ENABLE_RSPAMD=1
- RSPAMD_LEARN=1
- RSPAMD_GREYLISTING=1
- RSPAMD_HFILTER=1
- ENABLE_FAIL2BAN=1
- FAIL2BAN_BLOCKTYPE=reject
- SSL_TYPE=letsencrypt
- POSTFIX_MAILBOX_SIZE_LIMIT=104857600 (100MB)
- ENABLE_QUOTAS=1
- PFLOGSUMM_TRIGGER=daily_cron
- ENABLE_SPAMASSASSIN=0
Upload compose.yaml and mailserver.env files to your OCI Virtual Machine /data/docker folder, mailserver.env should be located at the same folder as compose.yaml, and run the following command:
sudo docker compose -f /data/docker/compose.yaml up mailserverYou should see an error message that at least one email address shall be created to properly run mailserver.
Press CTRL+C and stop your mailserver for now.
Follow the instructions on configuring your mail server from Docker-Mailserver documentation.
When you finish all your settings and run the docker container again:
sudo docker compose -f /data/docker/compose.yaml up -d mailserverAnd then check the logs of your Mail Server:
sudo docker logs mailserver --tail 100You should see the message like this:
ubuntu@mailserver:/$ sudo docker logs mailserver --tail 20
[   INF   ]  Welcome to docker-mailserver v13.3.1
[   INF   ]  Checking configuration
[   INF   ]  Configuring mail server
[   INF   ]  Starting daemons
[   INF   ]  mail.mymail.com is up and running
Mar 27 17:49:17 mail postfix/postfix-script[1057]: starting the Postfix mail system
Mar 27 17:49:17 mail postfix/master[1058]: daemon started -- version 3.5.23, configuration /etc/postfix
This means that the Mail Server started successfully, you have at least one email address added/created, all systems works fine.
Open ports in OCI
To make your Mail Server able to receive the mails or connect your Mail App to your Mail Server via IMAP, SMTP or ESMTP protocols you need to open those ports in OCI Network security list.
Go to Networking -> Virtual cloud networks -> [click on your network (mailserver)] -> Security Lists (2) -> [click on your preferred security list] -> [Add Ingress rules]. Add ingress rules as on the following screenshot (sample for port 25):
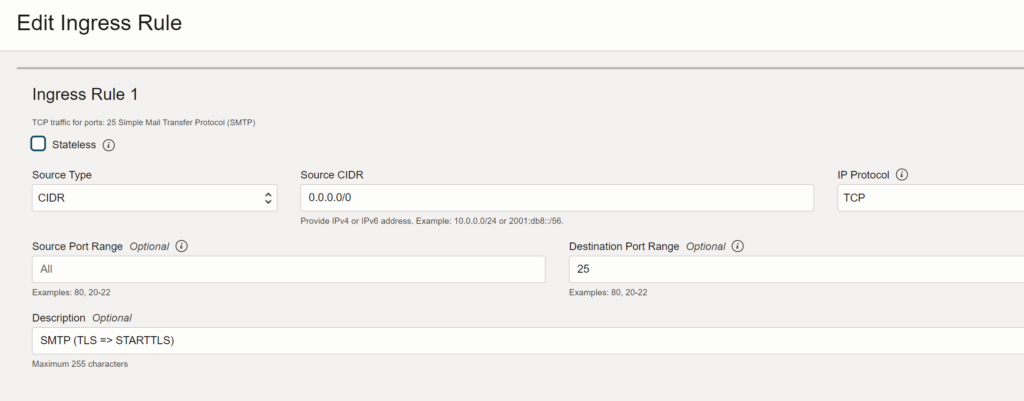
Repeat this process for other ports used in your Mail Server: 143, 465, 587, 993
You can also add RSPAMD port (11334), but make sure that you’ve applied all security precausings. If you don’t want to open RSPAMD port to public you can install cloudflared on your VM machine, create a security token on cloudflare and link it to your cloudflare tunnel (Zero Trust), so then only you will be able to open RSPAMD from your browser (add the security token to your browser’s headers).
Congratulations! That’s it. You’ve configured your own Mail Server on Oracle Cloud Infrastructure completely Free of charge, if you use the resources within the Always Free (or Free Tier) plan of course.
Leave a Reply
You must be logged in to post a comment.